
Build an Azure site-to-site VPN for DevTest
Integration testing in a hybrid cloud architecture can be challenging when you have to test between on-premises resources and cloud workloads. Azure’s site-to-site VPN makes it possible to extend your on-premises network to private virtual networks on the cloud.
Usually, such a setup requires hardware that supports IPsec VPN. Azure site-to-site VPN requires a device that is IPsec IKEv2 compliant. Obviously, if you don’t have a compatible VPN appliance, you are stuck, or if you have such an appliance but don’t want to affect the rest of the network, you may need to consider a software-based IPsec VPN alternative.
This post describes how to use Libreswan as a software-based IPSec VPN solution to connect to an Azure virtual gateway.
| Although this configuration works well for DevTest purposes, it is not recommended for production scenarios. |
The source code accompanying this article is available on GitHub.
The Solution Design
The design below shows a configuration that connects an Azure Virtual Network (VNet) with an on-premises network. This base configuration can be adjusted for your own specific needs.
In this configuration foxtrot can route traffic between 192.168.1.0/24 and 192.168.3.32/24, thereby connecting resources such as Alice and vm-echo with each other.

The Left side of the network uses standard Azure site-to-site components while the Right side of the network uses Libreswan, a free, open-source implementation of IPsec VPN.
Pre-requisites
To build this configuration, you’ll need the following:
-
An active Azure subscription.
-
Local network
-
A Linux instance to run the Libreswan VPN software, preferably a dedicated VM. The Libreswan installation script in this article was tested against both Debian 10.05 and Ubuntu 20.04 (Unfortunately compilation of Libreswan failed on Ubuntu 18.04).
-
A modem/router to configure Firewall/NAT rules
Quick Start
For the impatient, get going quickly by running the following steps, otherwise, skip to Provision Azure Resources:
-
Click the Deploy to Azure button to deploy the Azure S2S resources to your Azure subscription. The content of this ARM template can be viewed here.
-
Wait about 45 minutes for the Azure Virtual Gateway to be provisioned. You’ll need the pre-shared key (PSK) and the Virtual Gateway public IP (VGW VIP) from the previous step.
-
Install Libreswan on
Ubuntu 20.04orDebian 10.05, by running:sudo sh -c "$(wget -qO- https://raw.githubusercontent.com/philipf/azure-s2s-template/master/install-libreswan.sh)" -
Port forward UDP 4500 and UDP 500 from the VGW VIP to
Foxtroton your modem/router. -
Test connectivity by pinging
vm-echofromFoxtrotand visa versa
At this point, you should have a connected site-to-site VPN.
Provision Azure Resources
Start with the following if you haven’t performed the steps in the Quick Start section.
Provision the Azure resources by:
-
Deploying the ARM template, the easier option.
-
Or by running the PowerShell script, the more programmable option.
Using the ARM template
By far, the easiest way to deploy the ARM template is by clicking:
or deploy it with the Azure Portal, Azure CLI or Azure PowerShell.
Using PowerShell
Update the configuration variables in the PowerShell script below and then run it to provision the Azure site-to-site resources. The script can be run from either the Azure Cloud Shell or locally with Azure PowerShell
## Set configuration variables
$SharedKey ='YourSecureSharedKey9' (1)

# Azure (Left-side)
$ResourceGroup='rg-virtualgateway'
$Location='australiaeast'
$VNetName='vnet-extended-home'
$SubnetMyVmsName='snet-myvms'
$SubnetGatewayName='GatewaySubnet' (2)
$VgwName='vgw-devtest'
$VgwPublicIpName='pip-vgw-devtest'
$VgwConnectionName='s2s-devtest-home'
$LgwName='lgw-home'
$NsgName='nsg-myvms'
$VNetCidr='192.168.3.0/24' (3)
$SubnetMyVmsCidr='192.168.3.32/27' (3)
$SubnetGatewayCidr='192.168.3.0/28'

# Local network (Right-side)
$SubnetLocalGateway='192.168.1.0/24' (3)
$MyPublicIp = (Invoke-WebRequest -Uri icanhazip.com).Content.Trim()  (4)

# Create a new resource group to deploy all the S2S resources to.
# Deleting this resource group removes all the S2S resource with it.
New-AzResourceGroup -Name $ResourceGroup -Location $Location

# Create a firewall rule to allow ping traffic.
# This is not required but help for connectivity testing and can be removed later
$icmpRule = New-AzNetworkSecurityRuleConfig `
  -Name 'ICMP' `
  -Description 'Allow ICMP for ping commands' `
  -Access Allow `
  -Protocol ICMP `
  -Direction Inbound `
  -Priority 100 `
  -SourceAddressPrefix Internet `
  -SourcePortRange * `
  -DestinationAddressPrefix VirtualNetwork `
  -DestinationPortRange *

$NetworkSecurityGroup = New-AzNetworkSecurityGroup `
  -ResourceGroupName $ResourceGroup `
  -Location $Location `
  -Name $NsgName `
  -SecurityRules $icmpRule

# Hides annoying deprecated warnings, unfortunately no replacements commands existed yet :(
Set-Item Env:\SuppressAzurePowerShellBreakingChangeWarnings 'true'

$SubNetMyVms = New-AzVirtualNetworkSubnetConfig -Name $SubnetMyVmsName `
  -AddressPrefix $SubnetMyVmsCidr `
  -NetworkSecurityGroup $networkSecurityGroup

$SubNetGateway = New-AzVirtualNetworkSubnetConfig -Name $SubnetGatewayName `
  -AddressPrefix $SubnetGatewayCidr

  Set-Item Env:\SuppressAzurePowerShellBreakingChangeWarnings 'false'

$Vnet = New-AzVirtualNetwork -Location $Location `
  -Name $VNetName `
  -ResourceGroupName $ResourceGroup `
  -AddressPrefix $VNetCidr `
  -Subnet $SubNetMyVms, $SubNetGateway

$VgwPip = New-AzPublicIpAddress `
  -AllocationMethod Dynamic `
  -IpaddressVersion IPv4 `
  -Location $Location `
  -Name $VgwPublicIpName `
  -ResourceGroupName $ResourceGroup

$SubnetGateway = Get-AzVirtualNetworkSubnetConfig -Name $SubNetGatewayName -VirtualNetwork $Vnet

$GwIpConfig = New-AzVirtualNetworkGatewayIpConfig `
  -Name 'GwIpConfig' `
  -Subnet $SubnetGateway `
  -PublicIpAddress $VgwPip

$Lgw = New-AzLocalNetworkGateway `
  -Name $LgwName `
  -Location $Location `
  -ResourceGroupName $ResourceGroup `
  -AddressPrefix $SubnetLocalGateway `
  -GatewayIpAddress $MyPublicIp

# Create the VGW, this step takes about 45 minutes
$Vgw = New-AzVirtualNetworkGateway `
  -Name $VgwName `
  -ResourceGroupName $ResourceGroup `
  -Location $Location `
  -IpConfigurations $GwIpConfig `
  -GatewayType Vpn `
  -VpnType RouteBased `
  -GatewaySku Basic (5)

$Vgw = Get-AzVirtualNetworkGateway -Name $VgwName -ResourceGroupName $ResourceGroup
$Lgw = Get-AzLocalNetworkGateway -Name $LgwName -ResourceGroupName $ResourceGroup

# Create the S2S IPsec tunnel
New-AzVirtualNetworkGatewayConnection `
  -Name $VgwConnectionName `
  -ResourceGroupName $ResourceGroup `
  -VirtualNetworkGateway1 $Vgw `
  -LocalNetworkGateway2 $Lgw `
  -Location $Location `
  -ConnectionType IPsec `
-SharedKey $SharedKey| 1 | Supply your own significantly complex PSK, this key is used on both sides of the IPsec tunnel, and you’ll will need it again as part of the Libreswan configuration. |
| 2 | By convention this must be named GatewaySubnet. 😦 |
| 3 | Adjust it to your network requirements, keep in mind that these networks should not overlap and should be private IP addresses. |
| 4 | Use icanhazip.com to obtain your public address, otherwise, supply your public IP address here. |
| 5 | Configured to use the Basic SKU, as it is the most affordable, it has limitations and is not meant for production use. |
| The provisioning of the Azure Virtual Gateway can take up to 45 minutes to complete, so this is a great place to take a break and grab a ☕. I advise against any 🍺 at this point, as things can get tricky to troubleshoot if a simple mistake is made at this point. 😉 |
Post-deployment
A successful deployment should result in the following resources being deployed:
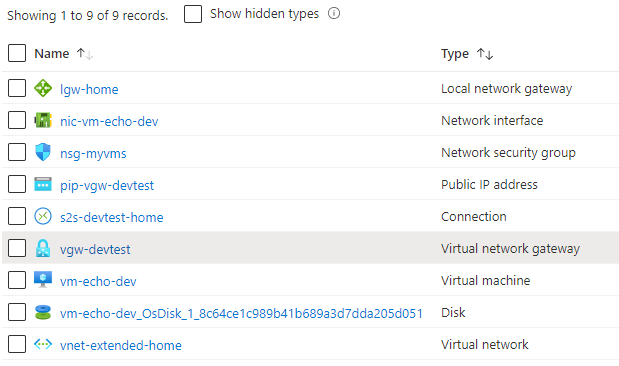
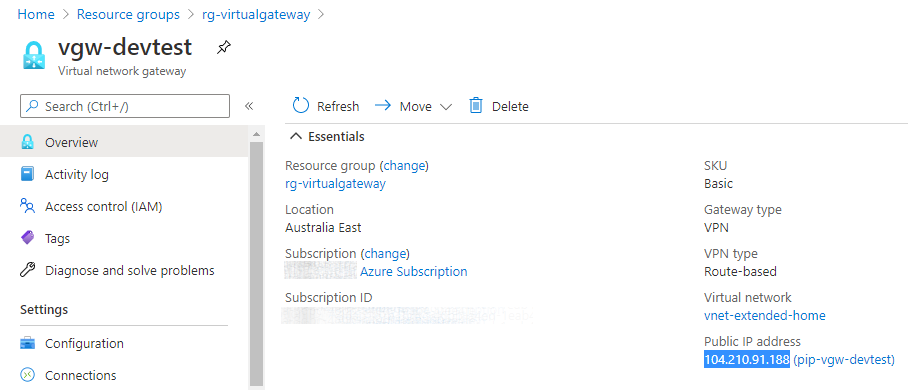
Obtain the Virtual network gateway’s public IP (VIP) by using one of the following methods:
(Get-AzPublicIpAddress -Name 'pip-vgw-devtest' -ResourceGroupName 'rg-virtual-gateway').IpAddressaz network public-ip show --name 'pip-vgw-devtest' -g 'rg-virtual-gateway' --query 'ipAddress' -o tsvor look it up in the Azure Portal
Firewall and NAT rules
Libreswan requires standard IPsecv2 ports to be open on your firewall. These ports are:
-
UDP port 500 and
-
UDP port 4500
This traffic has to be forwarded to the machine that runs Libreswan (Foxtrot 192.168.1.2)
On my Asus wireless router I configure my WAN port forwarding as follows:
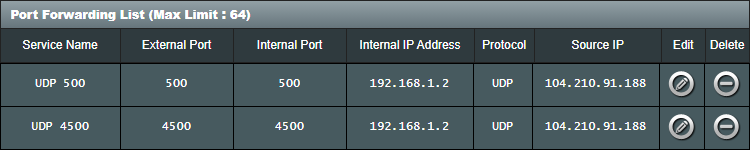
It is not required, but as an additional security measure, I have also locked down the source IP address to that of the VGW VIP.
Install and configure Libreswan
Once the Azure Virtual Gateway deployment is complete, continue to install Libreswan on a Linux machine, preferably a clean and dedicated virtual machine.
The installation script (install-libreswan.sh) downloads the source code, compiles, installs and configures version 3.32 of Libreswan.
For security reasons, support for DH2/modp1024 is removed at compile time from Libreswan since v3.30 (February 13, 2020).
At the time of writing Azure S2S VPN connections are created by default with an IPsec/IKE policy that uses DH2. 😟 Additional steps can and should be taken to select a better IKE policy for production use. Unfortunately, the Basic SKU for VGWs does not support custom IPsec/IKE policies and leaves us with the only option to use a VPN solution that still supports DH2, which in my case is acceptable for DevTest.
This script compiles the code with the USE_DH2=true flag to enable DH2/modp1024 that is required for Azure’s default IPsec policy.
Alternatively, one can upgrade to the next SKU (VpnGw1) that supports custom IPsec/IKE policies but it is more expensive.
I want to keep the instructions as simple as possible, with the idea that once a successful S2S connection is created, it can be modified accordingly.
#!/bin/sh
#
# Installs and configures Libreswan to connect an Azure VPN Gateway.
# See: https://blog.notnot.ninja/2020/09/12/azure-site-to-site-vpn/
#
# This script should be run via curl:
#   sudo sh -c "$(curl -fsSL https://raw.githubusercontent.com/philipf/azure-s2s-template/master/install-libreswan.sh)"
# or via wget:
#   sudo sh -c "$(wget -qO- https://raw.githubusercontent.com/philipf/azure-s2s-template/master/install-libreswan.sh)"
# or via fetch:
#   sudo sh -c "$(fetch -o - https://raw.githubusercontent.com/philipf/azure-s2s-template/master/install-libreswan.sh)"
#
# As an alternative, you can first download the install script and run it afterwards:
#   wget https://raw.githubusercontent.com/philipf/azure-s2s-template/master/install.sh
#   sudo sh install.sh
#

set -e

main() {
    echo 'Install Libreswan for an Azure site-to-site VPN'
    echo 'For more details: https://blog.notnot.ninja/2020/09/12/azure-site-to-site-vpn/'

    read -p 'Virtual Gateway IP (VIP): ' vgw_vip
    read -p 'Azure VNet [192.168.3.0/24]: ' left_subnet
    left_subnet=${left_subnet:-192.168.3.0/24}

    read -p 'Local network [192.168.1.0/24]: ' right_subnet
    right_subnet=${right_subnet:-192.168.1.0/24}

    read -p 'Pre-shared key: ' psk (1)

    apt update

    # Install the build dependencies for Libreswan
    apt install -y \
        libnss3-dev \
        libnspr4-dev \
        pkg-config \
        libpam-dev \
        libcap-ng-dev \
        libcap-ng-utils \
        libselinux-dev \
        libcurl3-nss-dev \
        flex \
        bison \
        gcc \
        make \
        libldns-dev \
        libunbound-dev \
        libnss3-tools \
        libevent-dev \
        xmlto \
        libsystemd-dev \
        gawk

    # Install wget to download Libreswan source
    apt install -y wget

    wget https://github.com/libreswan/libreswan/archive/v3.32.tar.gz

    tar -xzvf v3.32.tar.gz
    cd libreswan-3.32/

    # Include the deprecated Diffie-Hellman group 2 (modp1024) as required by Azure's Basic SKU
    export USE_DH2=true (2)
    export USE_FIPSCHECK=false (3)
    export USE_DNSSEC=false (3)

    make clean
    make base
    make install-base

# Create the connection definition to Azure
cat <<END > /etc/ipsec.d/azure.conf
conn azureTunnel
    authby=secret
    auto=start
    dpdaction=restart
    dpddelay=30
    dpdtimeout=120
    ike=aes256-sha1;modp1024
    ikelifetime=3600s
    ikev2=yes
    keyingtries=3
    pfs=yes
    phase2alg=aes128-sha1
    left=$vgw_vip
    leftsubnets=$left_subnet
    right=%defaultroute
    rightsubnets=$right_subnet
    salifetime=3600s
    type=tunnel
END

# Create secrets file with a pre-shared key
cat <<END > /etc/ipsec.d/azure.secrets
%any %any : PSK "$psk"
END

    # Enable and start the IPsec service
    systemctl enable ipsec.service
    systemctl start ipsec.service
    systemctl status ipsec.service

    printf "Completed successfully\n"
}

main| 1 | This is the pre-shared key that was supplied when the Azure Virtual Gateway was created. |
| 2 | Includes DH2 support at compile time. |
| 3 | For Debian/Ubuntu there is no fipscheck library, and unbound is build without event api. |
Libreswan uses the concept of 'left' and 'right' in its configuration files to distinguish between the two sides of the network; it doesn’t matter which side is left or right.
At this point, it should be possible to connect to resources located in the VNet, for example, ping vm-echo from Foxtrot:
philipf@foxtrot:~$ ping 192.168.3.36
PING 192.168.3.36 (192.168.3.36) 56(84) bytes of data.
64 bytes from 192.168.3.36: icmp_seq=1 ttl=64 time=35.7 ms
64 bytes from 192.168.3.36: icmp_seq=2 ttl=64 time=35.7 ms
and also after connecting with SSH to vm-echo it is possible to ping Foxtrot:
azureuser@vm-echo-dev:~$ ping 192.168.1.2
PING 192.168.1.2 (192.168.1.2) 56(84) bytes of data.
64 bytes from 192.168.1.2: icmp_seq=1 ttl=64 time=34.9 ms
64 bytes from 192.168.1.2: icmp_seq=2 ttl=64 time=36.0 ms
IPsec troubleshooting
Hopefully, you don’t need to read this section 😉, but if you are experiencing problems, I found the following commands and configuration files useful to debug problems with the IPsec service.
# View the left/right and encryption settings:
cat /etc/ipsec.d/azure.conf

# View the PSK
cat /etc/ipsec.d/azure.secrets# View the current ipsec status
sudo ipsec status
# Confirm that the ipsec connection is loaded and active
sudo ipsec status | grep "Total IPsec"
# It should return:
# 000 Total IPsec connections: loaded 1, active 1
# Control the ipsec service
sudo ipsec stop
sudo ipsec start
sudo ipsec status
# View the active tunnels (if any)
sudo ipsec whack --trafficstatus
# It should return:
# 006 #7: "azureTunnel/1x1", type=ESP, add_time=1600483905, inBytes=3824, outBytes=2224, id='104.210.91.188'Routing
Additional routing is required to enable communication between VNet resources and other local devices. For example Foxtrot connecting to Alice and vice versa.
Configure Foxtrot for routing
Foxtrot has access to both the 192.168.1.0/24 and 192.168.3.0/24 networks and therefore can be configured to route traffic between them.
Update the /etc/sysctl.conf file with the setting below to enable IP forwarding and also to persist the setting when the VM restarts.
net.ipv4.ip_forward=1Apply the change by running:
sudo sysctl -p /etc/sysctl.confAlso, update iptables with the required masquerading rules.
sudo modprobe iptable_nat
sudo iptables -t nat -A POSTROUTING -o eth0 -j MASQUERADE
sudo apt install iptables-persistent
At this point, it should be possible to connect from 192.168.3.0/24 to other devices on the 192.168.1.0/24 network in addition to 192.168.1.2.
For example:
azureuser@vm-echo-dev:~$ ping 192.168.1.1
PING 192.168.1.1 (192.168.1.1) 56(84) bytes of data.
64 bytes from 192.168.1.1: icmp_seq=1 ttl=63 time=35.5 ms
64 bytes from 192.168.1.1: icmp_seq=2 ttl=63 time=43.8 ms
It still not possible to route traffic from Alice and other 192.168.1.0/24 devices to the 192.168.3.0/24 network, but we will fix that next.
Configure Alice (or the Router) for routing
For this to work, a routing rule is required. To achieve this, we need to update the routing table that Alice is using. A networking rule can be configured on either the default gateway’s routing table that Alice is using or directly on Alice’s local routing table.
To keep it simple, we will update the local routing table on Alice.
Run these commands in PowerShell with elevated privileges (Admin).
First, get the network interface index InterfaceIndex for the network adapter that is connecting Alice to the 192.168.1.0/24 network.
Get-NetRoute -DestinationPrefix 192.168.1.0/24 | Select-Object InterfaceIndex, InterfaceAlias

InterfaceIndex InterfaceAlias
-------------- --------------
14 vEthernet (External (LAN)) (1)| 1 | My InterfaceIndex is 14 and yours will most likely differ |
Next, create a new routing rule by using the InterfaceIndex from the previous step.
New-NetRoute `
  -DestinationPrefix 192.168.3.0/24 `
  -InterfaceIndex 14 `
  -NextHop 192.168.1.2
To confirm that the route has been added, run:
Get-NetRoute -DestinationPrefix 192.168.3.0/24

ifIndex DestinationPrefix NextHop     RouteMetric ifMetric PolicyStore
------- ----------------- -------     ----------- -------- -----------
14      192.168.3.0/24    192.168.1.2         256 25       ActiveStore
And then we should be set and ready to do a connectivity test by pinging vm-echo from Alice.
PS C:\Users\philipf> ping 192.168.3.36

Pinging 192.168.3.36 with 32 bytes of data:
Reply from 192.168.3.36: bytes=32 time=37ms TTL=63
Reply from 192.168.3.36: bytes=32 time=37ms TTL=63
No further configuration is needed, and hopefully, you reached this point with a working site-to-site connection. 🍾
|
After you completed your testing, you may want to clean up the custom routing rules from |
Final thoughts
Alternative network topologies
To keep things relatively simple, the instructions in this guide deploys the VPN host (Foxtrot) to the 192.168.1.0/24 network; I prefer to isolate my personal Lab network and have it on 192.168.2.0/24. Running it on an isolated network gives me more versatility when moving between different physical networks (e.g. home and office networks).
If you prefer such a setup, please refer to Build an isolated network with Hyper-V for a virtual lab.
Which means that foxtrot will have an IP address in the 192.168.2.0/24 network such as 192.168.2.2.
Basic SKU
The Basic SKU is relatively affordable at ~$26.28 US/month, but it has a couple of limitations to be aware of:
-
Bandwidth is limited at 100 Mbps
-
Custom IPsec policies are not supported, as mentioned in this article.
Still, it is useful for DevTest at this price range, as the next SKU is about five times the price at ~$138.70 US/month. Also, keep in mind that you will be charged for the duration that the Virtual Network Gateway is provisioned even if you don’t have any active connections. Outbound data charges apply after 5GB /month.
Security
-
Misconfiguration of your network can leave you open for attack, especially on the home network-side where many manual steps are required.
-
Make sure to select a strong PSK (at least 20 characters strong).
-
I also suggest the following when you are not actively using the S2S connection:
-
Shutdown your home VPN server
-
Remove your NAT rules
-
Switch off the Azure S2S connection
-
-
If you have a dynamic public IP address at home, keep in mind that it may change and will break the IPsec tunnel.
Appendix: IPsec policies
In case you prefer to upgrade from the Basic SKU, to rather use custom IPsec policies, I provided the following scripts and configuration snippets than can be applied over the existing deployments.
$Vgw = New-AzVirtualNetworkGateway `
  -Name $VgwName `
  -ResourceGroupName $ResourceGroup `
  -Location $Location `
  -IpConfigurations $GwIpConfig `
  -GatewayType Vpn `
  -VpnType RouteBased `
-GatewaySku VpnGw1 (1)| 1 | Swap Basic out for VpnGw1 |
$ipsecPolicy = New-AzIpsecPolicy `
-IkeEncryption AES256 `
-IkeIntegrity SHA256 `
-DhGroup DHGroup14 `
-IpsecEncryption GCMAES256 `
-IpsecIntegrity GCMAES256 `
-PfsGroup None `
-SALifeTimeSeconds 3600

New-AzVirtualNetworkGatewayConnection `
  -Name $VgwConnectionName `
  -ResourceGroupName $ResourceGroup `
  -VirtualNetworkGateway1 $Vgw `
  -LocalNetworkGateway2 $Lgw `
  -Location $Location `
  -ConnectionType IPsec `
  -IpsecPolicies $ipsecPolicy ` (1)
-SharedKey $SharedKey| 1 | Supply a custom IPsec policy |
conn azureTunnel
    authby=secret
    auto=start
    dpdaction=restart
    dpddelay=30
    dpdtimeout=120
    ike=aes256-sha256;modp2048 (1)
    ikelifetime=3600s
    ikev2=yes
    keyingtries=3
    pfs=yes
    phase2alg=aes_gcm (2)
    left=$vgw_vip
    leftsubnets=$left_subnet
    right=%defaultroute
    rightsubnets=$right_subnet
    salifetime=3600s
type=tunnel| 1 | Update the IKE encryption and integrity to match with AES256 and SHA256 specified in the New-AzVirtualNetworkGatewayConnection command |
| 2 | Update the IPsec ecryption and integrity to match with GCMAES256 specified in the New-AzVirtualNetworkGatewayConnection command |