
Build an isolated network with Hyper-V for a virtual lab
Occasionally, I need to spin up a few local virtual machines on my Windows 10 laptop to test a networking concept. Building a practical multi-machine configuration can be challenging. For me, this typically means:
-
The VM host can connect to the guest VMs.
-
The guest VMs can connect to the host.
-
The guest VMs can connect to each other.
-
The guest VMs can access the Internet.
-
And other network devices can connect to my guest VMs.
A simple solution may be to place the guest VMs on the same external network as the VM’s host network and obtain the IP addresses dynamically or to set them statically. Although this satisfies the listed requirements, it also means you don’t you have full control over the network configuration.
A particular issue for me is when I move between home and office networks, the IP ranges differ and require new IP addresses for my VMs. 😢 It also means certain tests, like running a DHCP server, is not a good idea or even possible.
The Solution Design
The image below shows the network topology with two networks, the home or office network (192.168.1.0/24) and the VM network (192.168.2.0/24).

The critical piece in this architecture is the Router with two virtual Network Interface Cards (NICs). It connects the two networks by routing traffic between them. Although connected, the virtual and physical network are still isolated from each other and won’t allow network traffic such as DHCP broadcasts.
|
Although the Router is, in a sense "bridging" traffic between the two networks, the term Bridging in networking is different from the routing explained here.
See Bridging on Wikipedia for more information.
I am sure Bridging can provide similar results. Still, I want to keep an option open to further control the routed traffic with something like iptables. |
A successful setup should allow for communication between the following nodes on the network:
192.168.2.13)$ ping 192.168.1.1
PING 192.168.1.1 (192.168.1.1) 56(84) bytes of data.
64 bytes from 192.168.1.1: icmp_seq=1 ttl=62 time=0.776 msand also
192.168.1.3) or Bob (192.168.1.4)> ping 192.168.2.13
Pinging 192.168.2.13 with 32 bytes of data:
Reply from 192.168.2.13: bytes=32 time<1ms TTL=63What you will need
The table below list the components necessary to build the Solution Design; the network address ranges are configurable for your specific needs.
| Component | Purpose | Configuration |
|---|---|---|
Network |
Preferably a wired network but WiFi also works. |
Nothing special |
Your laptop/workstation |
Virtual Machine Host |
|
VM Guest |
Virtualised Linux Router |
|
VM Guest (Optional) |
For testing connectivity |
Your choice |
Network router (Optional) |
Provides Internet access, DHCP server and other network functions |
Nothing special |
Build instructions
As evident from several guides on the Internet, there are many alternative techniques to build this virtualised network. I selected a configuration that suits my needs, which meant something that plays well with Windows 10, Windows Sandbox, WSL2 and Docker without having to buy or download additional software.
| I used VirtualBox in the past but using it with Docker Desktop for Windows and Windows Sandbox creates problems that I wanted to avoid, so Hyper-V it is. 😉 |
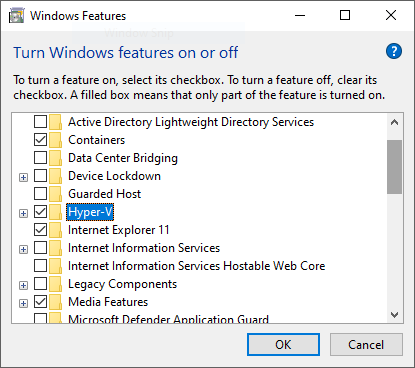
Hyper-V setup
Enable the Hyper-V role on your Windows 10 machine that will serve as the VM host.
Next, configure a new Virtual Switch for your network. You can think of the Virtual Switch as a software-defined version of a physical network switch. The Virtual Switch provides network connectivity to the selected VMs in the virtualised network.
Open Virtual Switch Manager… from the Hyper-V management console.
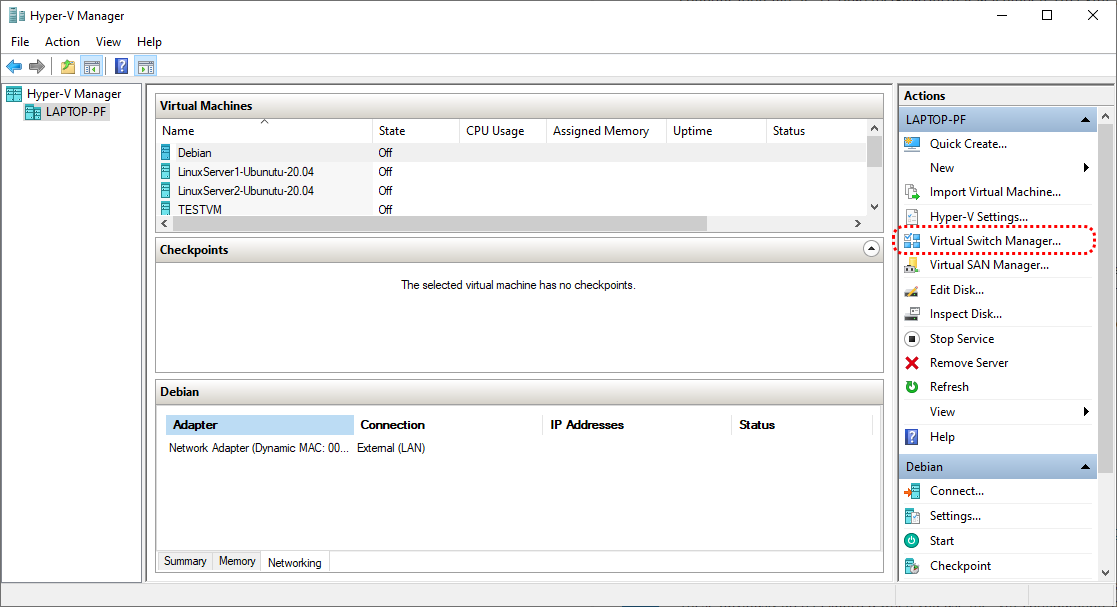
Press the Create Virtual Switch button and create a switch named External (LAN) and continue to configure the switch as per the rest of the settings below:
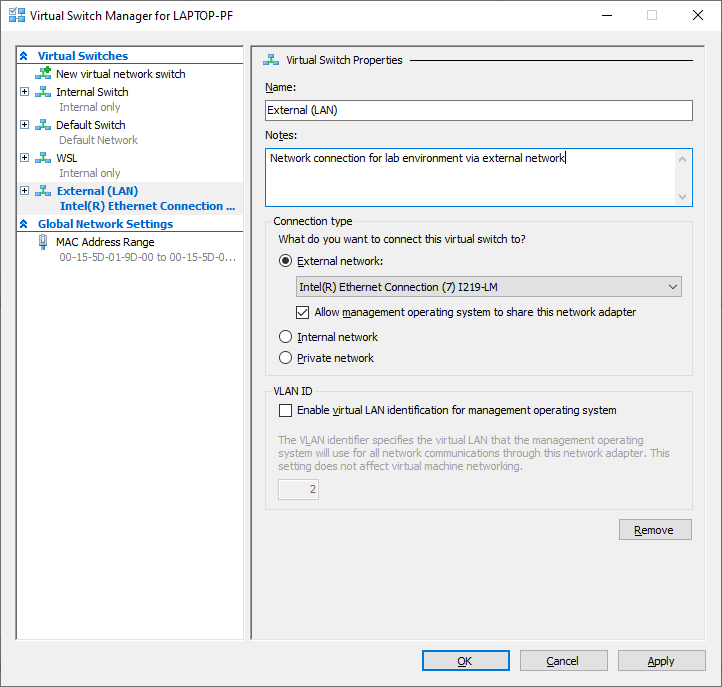
| Name | Value | Comment |
|---|---|---|
Name |
External (LAN) |
The name can be anything descriptive |
Connection type |
External network → Ethernet or WiFi connection |
Ethernet is preferred, it is faster, but some people experienced issues with a WiFi configuration |
Allow management operating system to share this network adapter |
Yes |
Share your existing network adapter between the host and guest VMs |
At this point, the newly created Virtual Switch is configured but not yet in use as it is not assigned to any VMs yet.
Configuring the Linux Router (192.168.1.10 & 192.168.2.10)
The router is a virtual appliance with two virtual NICs that connects the two networks. I selected Linux as the operating system for this task as it is free, simple to configure and only requires a small amount of system resources.
I tested with Ubuntu 20.04 and it also works. Still, I wanted to reduce the resource footprint a bit and decided to use Debian 10.5 instead. I am sure this can still be further optimised, but 1GB of hard disk space and 256MB of memory was good enough for me.
To create the VM run the Powershell commands below with Admin privileges.
## Settings
# Download settings
$DebianIsoUri = 'https://cdimage.debian.org/debian-cd/current/amd64/iso-cd/debian-10.5.0-amd64-netinst.iso'
$InstallMedia = Join-Path $env:USERPROFILE 'debian.iso'

# New VM settings
$VmName = 'LinuxRouter'
$VmPath = Join-Path $env:PROGRAMDATA Microsoft\Windows\Hyper-V 'Virtual Machines'
$VmVhdPath = Join-Path $env:PUBLIC Documents Hyper-V 'Virtual hard disks' "$VmName.vhdx"
$ExternalSwitch = 'External (LAN)' (1)
$InternalSwitch = 'Internal Switch' (2)
$MemoryStartupBytes = 2GB (3)
$NewVHDSizeBytes = 1GB

## Actions
# Download ISO to the user's download folder
Invoke-WebRequest -Uri $DebianIsoUri -OutFile $InstallMedia (4)

# Create the VM for the Linux router
New-VM -Name $VmName `
    -NewVHDPath $VmVhdPath `
    -MemoryStartupBytes $MemoryStartupBytes `
    -NewVHDSizeBytes $NewVHDSizeBytes `
    -Generation 1 `
    -Switch $ExternalSwitch

Add-VMNetworkAdapter -VMName $VmName -SwitchName $InternalSwitch
Set-VMDvdDrive $VMName -ControllerNumber 1 -ControllerLocation 0 -Path $InstallMedia

## Start and connect to the VM
Start-VM $VmName
vmconnect.exe localhost $VmName| 1 | The name of the switch must match exactly with the newly created virtual switch, this will be eth0. |
| 2 | This is the default Hyper-V switch, this will be eth1. |
| 3 | The installation process requires more memory, and we will reduce it later in the process. |
| 4 | This is a 360MB download. |
After running create-router.ps1 the Router VM should be running and prompting you to start the Debian installation process.
The installation is relatively straightforward, except for defining the partition table for a 1GB drive. Unfortunately, the Guided partitioning process fails because of the small 1GB drive. It requires the additional step of manually creating the partition table.
The primary settings during the OS installation process are:
-
Configure
eth0for networking,eth1will be configured later. -
Manually create a partition with the following configuration:
-
Primary 1GB, ext4
-
Logical 71MB, swap
-
Alternatively view the installation instructions here.
When the installation is done, update the current allocated memory by reducing it to 384MB.
Stop-VM $VmName
Set-VMMemory $VmName -StartupBytes 384MB -DynamicMemoryEnabled $false
Start-Vm $VmName
Next, connect to the newly created Linux VM to set its network settings. I suggest using Hyper-V to connect to the VM and obtain its current IP address after that connect to it with a more convenient terminal.
To obtain the IP address for eth0, run:
ip -br a show dev eth0Update the Debian networking settings by updating the /etc/network/interfaces file.
su -
vi /etc/network/interfaces
Update the contents of the file according to your network settings:
# This file describes the network interfaces available on your system
# and how to activate them. For more information, see interfaces(5).

source /etc/network/interfaces.d/*

# The loopback network interface
auto lo
iface lo inet loopback

# The primary network interface
allow-hotplug eth0

#iface eth0 inet dhcp (1)
iface eth0 inet static
  address 192.168.1.10 (2)
  netmask 255.255.255.0
  gateway 192.168.1.1 (3)

# The secondary network interface
allow-hotplug eth1
iface eth1 inet static
  address 192.168.2.10  (4)
netmask 255.255.255.0| 1 | Commented in case eth0 should be obtained from a DHCP reservation. |
| 2 | This should be an available IP address on the physical network. |
| 3 | The default gateway on the physical network. |
| 4 | The secondary IP address (eth1) for the Linux Router. |
Apply the new network settings with the following commands
(If you are connected with SSH you will be disconnected when the network settings for eth0 kicks in).
su - (1)
ifup eth1
ifdown eth0; ifup eth0| 1 | Execute the following commands as the root user, make sure to use the password that you specified during the Debian installation process. |
To route packets between the two networks, IP forwarding has to been enabled on the Linux Router.
While connected to the Linux Router 192.168.1.10 perform the following steps.
Update /etc/sysctl.conf with the setting below to enable forwarding and also to persist the setting when the VM restarts.
net.ipv4.ip_forward=1Apply the change by running:
sysctl -p /etc/sysctl.confmodprobe iptable_nat
iptables -t nat -A POSTROUTING -o eth0 -j MASQUERADE
iptables -A FORWARD -i eth1 -j ACCEPT
apt install iptables-persistent (1)| 1 | iptables-persistent persist the iptable settings between reboots, when prompted choose to save rules for ipv4. |
At this point, it should be possible to run the following commands from the Linux Router successfully:
ping 192.168.1.1
ping 192.168.1.3 (1)
ping 192.168.2.13 (2)
ping www.google.com| 1 | Make sure Windows 10’s firewall is not blocking traffic. |
| 2 | Optional, if the VM already exists. |
The hard work has been done, and we are only left with a few small steps on the other network nodes. 😅
A quick note about Network Gateways
To route traffic between different networks, the help of network gateways is needed. Routing tables on each client contains rules that indicates which gateway to use for a given destination.
In this example, when Alice communicates with Dave, the routing rules for Alice contains something like "send all 192.168.2.0/24 traffic to 192.168.1.10".
A slightly more involved scenario is when Carol wants to access the Internet, it requires an additional gateway hop.
-
The first routing rule on Carol’s machine is to send all undefined traffic (0.0.0.0) to 192.168.2.10
-
The second routing rule on the Lab Gateway is to send all undefined traffic (0.0.0.0) to 192.168.1.1
Configuring Alice (192.168.1.3) and Bob (192.168.1.4)
To access network devices on 192.168.2.0/24, a routing rule is required for devices on the 192.168.1.0/24 network.
This routing rule can be implemented in two ways:
-
Local routing on each machine, This can be useful if you want to limit the routing to specific machines or if you don’t have access to the routing table on the default gateway
192.168.1.1. For an office network, this is a safe option when you don’t want to route everyone’s traffic to your network lab. -
Update the routing table on the default gateway. This has the advantage that all clients on the source network gets the benefit of a single route rule entry. This is my configuration for my home network, and I achieve this by updating my Asus router with an additional routing rule.
To add a routing rule on Alice and Bob run the following Powershell commands as Admin:
$adapter = Get-NetAdapter |
Where-Object {$_.Name -like '*External*LAN*'} | (1)
Select-Object -Property ifIndex, Name

New-NetRoute `
-DestinationPrefix '192.168.2.0/24' `
-InterfaceIndex $adapter.ifIndex `
-NextHop 192.168.1.10| 1 | Make sure the virtual switch is named External (LAN) for this command to find the correct network adapter. |
To confirm the entry has been added to the local routing table run:
Get-NetRoute | Where-Object {$_.DestinationPrefix -eq '192.168.2.0/24'} | Format-Table -AutoSizeand it should show the following result (your network interface index might differ)
ifIndex DestinationPrefix NextHop      RouteMetric ifMetric PolicyStore
------- ----------------- -------      ----------- -------- -----------
2       192.168.2.0/24    192.168.1.10         256 25       ActiveStore
At this point, you should be able to ping Carol and Dave and the Linux Router on 192.168.2.10.
Alternatively, you can also perform the routing rules in an elevated Command Prompt.
This produces the same results, but Powershell makes it a bit easier to script the commands (😉 use Powershell).
|
netsh int ipv4 show interfaces (1)
pause
route -p ADD 192.168.2.0 MASK 255.255.255.0 192.168.1.10 METRIC 100 IF 2(2)
route PRINT (3)| 1 | Lists all the network adapters to obtain its interface index for the next command. |
| 2 | Replace the IF value of 2 with the network index for the adapter named vEthernet (External (LAN)) that was returned from the previous command. Also, note the -p switch to persist the rule between system restarts. |
| 3 | Confirm that the network setting has taken effect by reviewing the Persistent Routes section if -p was specified. |
When your testing is complete and want to remove the routing rules, run one of the following commands:
Remove-NetRoute -DestinationPrefix '192.168.2.0/24'route DELETE 192.168.2.0Configuring Carol (192.168.2.13) and Dave (192.168.2.14)
This step is optional.
Typically, these VMs runs useful workloads for development or testing purposes, and it is up to you what you install on them.
For these machines to access the Internet and the 192.168.1.0/24 network, make sure these machines have a default gateway of 192.168.2.10.
Testing the network
At this point, you should be able to communicate between all nodes on either of the networks.
The following tests should all work:
| Keep in mind that Windows 10’s firewall will block incoming traffic by default and that you might want to adjust Windows Defender Firewall rules accordingly. |
192.168.1.0/24)ping 192.168.1.10 ping 192.168.2.10 ping 192.168.2.13
ping 192.168.1.1
ping 192.168.1.3 (1)
ping 192.168.1.4
ping 192.168.2.13
ping 192.168.2.14
ping 1.1.1.1
ping www.google.com (2)
| 1 | Make sure Windows 10’s firewall is not blocking ICMP traffic. |
| 2 | Review /etc/resolv.conf to ensure a valid DNS resolver is configured. |
192.168.2.0/24)ping 192.168.2.10 ping 192.168.1.1 ping 192.168.1.3 ping 192.168.1.4 ping 1.1.1.1 ping www.google.com
What is next?
We are done, and you should have an isolated network environment for your test lab. 👊
It might be useful to automate the process of switching between networks if you move between home and office networks often. This can be accomplished by scripting the required changes on the Linux router and your machine.